I left New York City two months ago with my head spinning. I had so many ideas for where I wanted Nikki, In Stitches go, and how it was going to grow…and soon you’ll see all the surprises I have in store! But I also left with my heart just completely warmed to its core. I had made some of the best friends I’ve ever had. Not only did we instantly bond over our creativity and our passions for what we do, but it was like we became giddy school girls all over again! And what’s even more amazing, is that over two months later, we’re still the same way! These girls are the best cheerleaders I could ever ask for. They raise me up when I’m feeling down. They inspire me with their creativity. They make me laugh. (They laugh at my bad jokes.) And I really consider myself a lucky girl to have them beside me.
 So, after all that sappy stuff, I am so proud to introduce you to one of them today! Jen is the birthday party genius behind Passion-for-Parties.com. On her site you can find ideas and inspiration for every party theme you could ever dream of. (And if that’s not enough, you can find even more amazingly creative ideas on her blog!) Jen is the kind of person that if you ask her for help with a project, she comes back with four or five ideas…all of them amazing. When she showed me a picture of these sweet mini cake banners I was instantly begging her to do a guest post…and I couldn’t have been happier when she agreed! You’re going to love her, too! You get just a glimpse of her sweetness in her post below!
Enjoy,
Nikki, In Stitches
Hi there! I’m Jennifer from Passion-for-Parties.com, and I’m so excited to be hosting a guest feature here on Nikki, in Stitches!
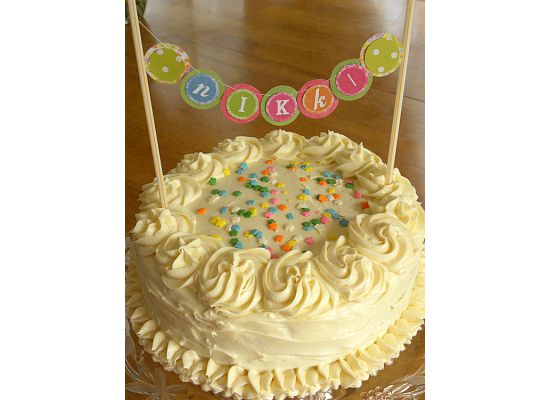
I’m a party girl, and I love little touches that transform ordinary party elements into something spectacular. Like this mini party banner that I made for a birthday cake:

Isn’t that fun? And it’s such a versatile idea! You can use any color scheme that you’d like, and it can be used for virtually any occasion…birthdays, graduations, baby showers, retirements…you name it!
The best part? It’s so easy to make. And I’m going to show you how!
Here’s what you’ll need:

Scrapbook paper (in any colors that you’d like)
Small letter stickers (or pre-lettered scrapbook circles)
Measuring spoons
Needle and thread
A pencil
Two straws (Bake it Pretty and Sweet Shop Lulu have some really cute ones)
Scissors
Double-sided tape or glue
How to Make Your Cake Banner
Step 1: Using the ¼ teaspoon measuring spoon as a guide, trace circles on the back sides of the scrapbook paper that you’ve chosen. You’ll need one circle for each letter that you’ll be using. If you’d like decorative circles on the ends, cut two extra. Repeat with the ½ teaspoon, making the same amount of circles.

This is what you’ll end up with…
")
If you aren’t using the pre-lettered scrapbook circles, place your letter stickers in the center of the small circles.
Step 2: Use double-sided tape or dots of glue to adhere the small circles to the large circles like this…

Step 3: Next, thread the needle, then feed it through the first straw near the top.

Step 4: Poke the needle through the front of the first circle, on the left side. Pull the thread through to the back, then poke the needle through the back of the right side.


Continue until all of the circles have been strung.
")
Step 5: Thread the needle through the second straw. Center the circles between the straws, allowing enough slack for them to drape a little bit, then cut the thread and tie the ends off on both sides.

Step 6: Insert the straws into the cake, being sure to push them far enough down that they will stand securely. If necessary, insert the straws at an outward angle to accommodate longer words.
That’s all there is to it! Super easy right? And super, duper cute!
Have fun with it and happy celebrating!
Jen
Follow Passion-for-Parties.com on Facebook!
Follow Passion-for-Parties.com on Twitter!


Love everything about this post. Love the sweet words in the beginning. You are amazing Nikki and I am beyond thrilled that I met you in New York. You inspire us all everyday. Jenn did an amazining job on the guest post and the tutorial. I just put a banner on a cake last weekend and the straw idea would have been GREAT! Thank you for sharing!!
I love, love, LOVE everything about this post including Terri’s perfect comment!!! You girls are AMAZING, I am SO blessed to call you friends!!! The cake looks so yummy, the banner is beautiful and I la-la-love that it says Nikki!!!
xoxo,
Kristen
Too Cute!
There is nothing better than waking up to see MY post on THE one and only Nikki, in Stitches blog! I am honored beyond words! Nikki, thanks SO much for the opportunity, and for your sweet words that bring tears to my eyes every time I read them. You are amazing and inspire me every day! I’m SOOO incredibly lucky to call you my friend! xoxo,
Jen
This is too cute! I forwarded to my mother in law, who is an avid baker and crafts person. She always makes the birthday cake for every family party. This is right up her ally. I’ll let you know if we see one at a party sometime soon! Keep up the good work!
merci ma grande mis ton lien sur mon blog bises jojo passe un bon week end
(A big thank you, my dear! I put your link on my blog. Kisses, jojo Have a good weekend!)
This is such a cute idea! Love it
Super cute idea! I will try this on my next cake (although my cake would not come out nearly as beautiful as the cake in the pics). I will try and do it justice!
http://needleshooksbooks.com
Nancy,
So, so happy you like our little cake banner!
I can’t take credit for the cake…that’s Jen. My talents really don’t move very far from my craft room…and certainly not into the kitchen!
Nikki
PS…LOVE your blog! Those skirts are super cute!!
Thanks Nikki,
The shirt skirt is really easy to make! I can bake the cake, but when it comes to decorating it, that is where I need some lessons! Great post!
I wrote my blog address wrong above:
http://needleshooksbooks.blogspot.com/
How adorable. I just love this so much. Fast and Fancy, now that is my style. So glad I found ya from craftgossip!
I’m really not much of a baker, but this is such an adorable idea! So cute
Terrie!
That’s another reason why I love this little cake banner!
With such an adorable decoration on top, no one will even notice if your cake is store bought!!
Nikki
Finally a tutorial On this topic that is clear , well written and easy to understand! Tks a million!!!!