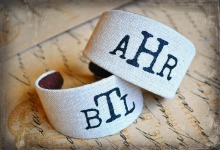
Six months ago, when I started posting Christmas projects, I thought I had plenty of time to get everything on my list done, and maybe even squeeze in a few extra little things along the way. And, as usual, I drastically overestimated myself and how quickly I can work through projects. My 12 Days of Christmas bags are still in pieces, and my “Merry Christmas” BOM Quilt is, at this point, only “Merry Chr”…I only made it to the “I” in Christmas. Last night, I did scramble to get our stockings finished. (I didn’t really have a choice…how could we not have stockings on Christmas?) I had every intention of putting up an entire how-to on these, but I’ve had to condense it down to a simple embroidery tip. If the technique for the body of the stockings looks familiar, I did “borrow” it from fabric scrap notecards that I made over the summer. You may remember I spotted them on Moda Bake Shop.
My embroidery tip is either a testament to how crafty I am, or an example of how completely lazy I am. Or maybe it shows how we moms can be the best multi-taskers and find ways to accomplish so much in one day while at the same time taking great care of our kids?? Whichever way you look at it, this little tip has saved me tons of time.
Many people ask how I embroider names on my pieces. I don’t have an embroidery sewing machine, so any monogramming is done by hand. I do not have great handwriting, and free styling it is just way too risky for me. I’d hate to ruin something that I’ve spent hours working on.
To get perfect embroidery, I first type what I’d like to write on my computer. I pick a font I like and enlarge it to my desired size. Then, I simply tape a piece of tissue paper directly to my computer screen. Yes, I don’t print it out…I tape right to the monitor.
I trace my wording, then pin the piece of tissue paper to my fabric.
I then sew right through both layers, my fabric and the tissue paper, using my traced lines as guides.
When all the embroidery is finished, I simply tear off the tissue paper. (I sometimes need to use a pair of tweezers to get some of the small pieces that are left behind.) I’ve used backstitch and chainstitch with this method and never have had a problem.
So, think of me what you will… a lazy crafter, an ingenious needlepoint expert, or a mom desperate for her kids to have stockings for Christmas. Regardless, it’s a good tip to have in your arsenal of tricks!
Happy Holidays!
Nikki, In Stitches
Possibly Related Posts from Nikki, In Stitches:
Drawstring Gift Bag How-To
The Christmas Countdown Has Begun
Always the Last to Know
")


Merry Christmas Nikki!!!
This is brilliant! Thanks so much for posting it….
Wendy
I love that you don’t even print it out! Thanks for sharing this great trick - and I’ll also be using my monitor as a “light box” in future.
this is a great tip! I’ve been too hesitant to try embroidering names and words. I’ll try this way, thanks
That is brilliant - absolute genius is never lazy, it is just efficient. I will be using this technique from now on!
way cool. I am going to try this. thanks for the tip
Wow that is fabulous. So modern. I’ve been reading the details of old embroidery books figuring out how to do various techniques, many of which are laborious. I’ve got a light box and carbon paper and it takes several tracings, then still isn’t perfect. So this is just plain smarter. Thanks for sharing.
I’m going with genius! This is SUCH a brilliant idea!!! Thanks for sharing!!
I love your tip. That is a great way to do it! Love your stockings!
I LOVE it!!!! I just finished a top for my daughter and it worked like a charm! Can not wait to try this on so many more items! Thanks for this fantastic tip, I do not think that I will have to pay for another monogram again!
Genius! I have some fleece shirts to embroider for my little one’s snuggle buddies and am going to try this-thanks!
Wow! Two questions…what kind of thread did you use and what kind of needle? I would love to do this!
I would like to know the thread as well please. This is SO great. It gets expensive and annoying to take all my projects to the sewing shop to have it embroidered. This looks much more “crafty” as well! LOVE IT! Thank you!
This is absolutely genius. You just alerted me to the best lightbox in the house! Happy new year!
Not absolutely sure, but I suspect this would not be a good idea on a laptop screen, or at least be very gentle with the pencil. OK on a glass monitor.
Shirley,
Thanks so much for stopping by my blog. Yes, I am very cautious when using this method on my laptop. I always trace very lightly so that the tissue paper does not rip, but am even more careful on my laptop monitor.
Thanks for the heads up!
Nikki
Excellent method. This will save me tons of time. Thank you so much for sharing.
An absolutely amazing idea!! I love monogrammed things and don’t have a machine either. I made a quilt for a baby shower gift recently with the baby’s name monogrammed on but my method was more difficult than this!!
Thank you for sharing.
This is awesome. I just learning free-motion embroidery. I can use this technique for all sorts of things.
This is such a great idea! It seems so simple! Thank you so much for posting this!
OH I love them!
Thanks sooo much!!!!!! Im going on a car trip with my fam and this is a good idea. I took your idea with the tissue paper, but im doin a rose instead! Thanks!!