Curious About The New Silhouette Curio?

Just stopping by today with a quick video.

It’s actually a snippet of last week’s Masters’ Program inside The Nikki, In Stitches Craft Academy.

For those of you with Silhouette cutting systems, and those of you considering one, whether or not to invest in a Curio seems to be a big question these days.

I know many of you are curious as to how it works, and how it compares to both the Silhouette CAMEO and Portrait.

This video gives you a peek at just a few of the difference. Trust me…it can do WAY more than just what you see in this little clip…but this will at least spark your interest!

And if you’d like to see it do even more before you make your decision on whether or not it’s a good for you and the crafts you like to make, I’ll be doing a free webinar within the next few weeks. Be sure you drop your email in the sign up box here on the site to get all the details!

Two things to note here:

  1. If you’re reading this in your in box and can’t see the video, just click here to watch it right on the Nikki, In Stitches site!
  2. If you already know this is the machine for you, you can use promo code STITCHES to get $15 off! Just click here to start shopping!

Enjoy,

Nikki, In Stitches

** This post contains affiliate links, which means I do receive compensation if you make a purchase using my promo code and link, but you know me…I only share products with you that I absolutely LOVE and use myself!**

Posted in Blog | Tagged , , , , | 2 Comments

How To Hem Tulle Ruffles (VIDEO Tutorial)

Lots of questions came in after my last post, asking for a close-up view of exactly how I used jewelry monofilament or fishing line in my tulle ruffles, so I thought I’d show a short video today. I demo the process twice…once from a distance showing how I have my sewing machine set up, and then again nice and close so everyone can see exactly how my sewing machine catches the wire in the hem.

Take a peek below! (If you’re reading this in your inbox and can’t see the video below, just click here to go right to the blog and watch there!)

And, I’m happy to report that the mermaid queen costume is complete (with a cape not shown above…that of course has layers, and layers, and layers of ruffles!) and I finished this year in record time…a full three days before Halloween.

For those of you still sewing, I’m sending good thoughts your way. I’ve been in your shoes…sewing straight on through until it’s time to actually put on costumes.

Hang in there.

And for all of your hard work that doesn’t get nearly enough recognition, I officially give you permission to eat all of yours kids peanut butter cups.

Enjoy,

Nikki, In Stitches

Posted in Blog | Tagged , , , , | 2 Comments

How To Hem Flowing Tulle Ruffles With Jewelry Wire? {A Sewing Tutorial}


As I mentioned in my last post, I am in the throes of some serious Halloween costume sewing these days. And I do mean serious.

My kitchen table is covered with yards of pink tulle that I push to the side for meals, then break back out when all the crumbs have been wiped away.

And if you’re a self taught seamstress like me, tulle could possibly be the most ‘unfun’ fabric to work with, right? It moves, it pulls, it slips and slides, (pins NEVER stay in it where you put them!!) but it’s pretty much a staple in most Halloween costumes. There’s no getting around it…especially this year, when I’ve been charged with making my five year old daughter into a mermaid queen.

I stumbled upon a great way to finish the edges of your tulle that I thought I had to share.

Not only does the finished edge help keep your tulle from fraying long after Halloween has passed and your finished work of art has found its way into your child’s dress up bin, but it also gives the edge a beautiful flow…no sharp edges or folds here!

Just waves and ripples of beautiful tulle, which really…let’s be honest.

If you’re going to spend the time (and by “time” I mean DAYS) to hand make a great costume, it should have waves and ripples…and also bring you a margarita on the rocks with salt…but hey. At this point, I’d take a room temperature cup of coffee as long as the end of this tulle was in sight.

Enjoy,

Nikki, In Stitches

Materials:

  • Tulle
  • Coordinating Thread
  • Sewing machine and basic sewing supplies
  • Fishing line (Wait! I know! This is kind of crazy, right? But THIS is what gives the tulle the “ripples” and NOT the “folds” when you gather it! And one more thing! If you’re like me and enjoy one stop shopping, swap out the fishing line for the heaviest monofilament you can find in the jewelry department of your craft store…it will work the same way!)

Directions:

  1. Fold over and pin about a 1/4″ inch hem along the edge of your tulle, being sure the fishing line or monofilament is INSIDE the hem.
  2. Use a very skinny zig zag stitch to not only hold the hem in place, but keep the fishing line encased! (If you look up at the picture at the top of the post you can see the monofilament “shining” a little bit, trapped inside the hem!)
  3. Gather your tulle just like you normally would on the unfinished edge!

Ta Da! See that? One side is gathered, but the other side has flowing rolls, NOT bunches or folds! Great tick, right? Plus it adds a little more dimension to your fabric…not a margarita, or even a cup of room temperature coffee…but dimension, just what you (and your tulle) need. (Insert sarcastic face here!)


Posted in Blog | Tagged , , , | Leave a comment

Countdown To Halloween Blocks {DIY}

Halloween is such a fun time in our house. It’s the start of decorating season (you know, the constant swap out of decor for Halloween, Thanksgiving and Christmas?), sports kick into high gear for now two of my kiddos, and the yearly costume challenge begins.

The costume challenge goes something like this “Mom, could you make me look like this?” while one or more of my children point to a ridiculously expensive (and, mind you, very ornate!) costume in a magazine, I instantly start thinking of the man hours and supplies I’ll need to pull it off, and I try my hardest NOT to just say “Go get my wallet…I’ll just buy it for you.”

Every year I try to make one from scratch.

(Just one. Two would be hard. Three would be insane. So it’s just one. The others get “half homemade”…sometimes even 75%…and that seems to work. And yes, it’s usually my daughter’s because I know she’ll wear it for dress up straight on through to summer!)

And every year they challenge me more. But I do love it. These are the costumes we both will remember forever! For example, she’ll remember running through the neighborhood trick-or-treating in a sequined mermaid queen costume, complete with cape, wand, and tiara. And I’ll remember staying up until midnight, sewing, seam ripping, swearing, and “re-sewing” what seems to be endless yards of tulle.

This is what memories are made of!

So now that I think about it, I guess these “Countdown to Halloween” blocks not only are exciting for my children as they run downstairs every morning to see how many more “Nights Til We BOO!” but they are also a daily reminder for me. A reminder that I should be spending a bit more time each morning, afternoon (and probably also evening!) at my sewing machine…creating memories!

Enjoy! And if you’re anything like me, you’ll also be making set of these for pretty much every other holiday!

Nikki, In Stitches

PS…You may have noticed you haven’t heard from me in awhile, and there a lot of reasons why…some good and some not so good. For example, a good reason is because The Nikki, In Stitches Craft Academy has taken off like crazy and it keeps me very busy. A not so good reason is I’ve had quite a few health hiccups this year, and to be honest, I’ve still got some time before I’m back to 100%. But speaking of being back, it feels good. It feels really good. And I hope you’re just as happy to see me back, as I feel to be back. Thanks for sticking around.

Materials:

  • Unfinished wooden blocks, specifically two cubes and one rectangular piece both cubes will fit on top of (NOTE: While you certainly can cut these yourself, now you can find them in your local craft store!)
  • Black paint and a paint brush
  • An assortment of Halloween decorative papers
  • Decoupage medium
  • Sand paper
  • Alcohol inks and felt applicator pads
  • Number and letter stickers (As many of you can guess, I cut mine with my Silhouette from adhesive vinyl, but you can certainly stickers in your craft store that could work!)

Directions:

  1. Paint your blocks black and let them completely dry.
  2. Cut your papers to be 1/4″ smaller than all of the faces they will be applied to. For example, if your blocks are 3 1/2″ cubes, cut all of the papers for the cubes 3 1/4″ square!
  3. Use your decoupage medium of choice to apply your papers to the faces of all of your wooden blocks and again, let it completely dry!
  4. I wanted to “age” these because I thought it gave them more a “Halloween” feel so I sanded mine with sand paper, being sure to “rough up” the edges of the blocks themselves, AND the edges of all of the papers! This is totally optional!
  5. And again, because I wanted these to look old and spooky, I grabbed some alcohol inks and a scrap of white felt and rubbed a little bit on the papers! This one is optional, too!
  6. Apply your letter and number stickers!

There are two important notes to make sure your countdown blocks work correctly!

NOTE 1: THE BLOCKS ARE NOT THE SAME! If you want to be able to countdown like I did from 31 sleeps, apply your stickers this way:

Block 1: 0, 1, 2, 4, 5, 6

Block 2: 0, 1, 2, 3, 7, 8

NOTE 2: You MUST pick a font where your 6 and 9 are interchangeable by just flipping your cube over!


Posted in Blog | Tagged , , , , , , | 4 Comments

Five Years In The Making {A Hand Applique Love Affair}

For five years I carried this beauty with me, and while I love my daughter with all my heart, I’m actually referring to the quilt in the picture above.

I started this quilt when that precious five year old little girl was just four weeks old. Together, her and I took the last few stitches just a few days ago. It’s “her quilt” she says, which is fine by me. If one day my grandchildren wrap themselves in it the way she does, I will be a very happy woman.

And while I’m delighted that this beauty is finally complete (yes, it still needs to be quilted…I’ll send it out for that, and then bind it by hand) I find myself missing her already.

She was by my side through everything the last five years brought my way.

I was so excited to start her, even though finding the time at first was so hard…I had a newborn and a two year old I spent my days chasing after.

She’s been on vacation with me every summer, from the Jersey shore, to Disney World, even to the beaches of Mexico.

She rode with me on the train each time I (very) nervously made my to New York City to meet Martha Stewart. She also helped calm my nerves on a very long flight to Los Angeles to tape Craft Wars, and an even longer flight home having come in second place.

She sat by my grandmother’s side as I stitched and listened to my Annie tell stories I hope I’ll never forget.

She’s been there for me when I needed a distraction…a way to take my mind off my troubles.

She’s sat outside with me and enjoyed stitching in the afternoon sun. She’s wrapped around me and kept me warm as I stitched on cold winter nights.

She’s been to doctor’s appointments, soccer practice, and ballet lessons.

She’s taken long drives with me and helped keep me awake as I was my husband’s copilot.

She’s seen another beautiful baby welcomed into our family.

She’s moved from house to house to house with me…yes, she’s been around that long that she’s seen us move twice.

Every up and every down. Every high and every low.

And I know it’s crazy, but I miss her.

I’m already on the hunt for her replacement (I feel lost without a project to keep my hands busy) but she has set the bar high.

And while she’s relied on me to very slowly and carefully piece her together stitch by stitch, I’ve needed her much more over these last five years.

And I know it’s crazy, but I miss her already.

Nikki, In Stitches

Posted in Blog | Tagged , , , , , | 5 Comments

Somehow It Will All Get Done {Christmas, Crafts, and Cupcakes}

I hope everyone had a wonderful Thanksgiving holiday, filled with time spent with family and friends.

If you’re like me, the excitement that began quietly filling the days leading up to Thanksgiving is now screaming and shouting…Christmas is coming faster than I sometimes think I can manage.

At times like this crafting for myself falls to the bottom of my to-do list. Instead I find myself scrambling to make all the those gifts that seemed like they’d be a simple project months ago…and now are literally keeping me up at night as I work my way through them.

I know many, many of you can relate.

What’s funny is I’ve never actually not gotten everything done. I’ve never not given someone a present because it was still in pieces on my craft table. I’ve never not decorated my house. I’ve never shown up empty handed to a party because my cookies were still baking in the oven.

Somehow we find a way to get it all done.

So this year I’m trying really hard to constantly remind myself of that.

Somehow I will get it all done.

We will have a decorated house.

I will finish everyone’s gifts and have them wrapped by Christmas.

We will bake cookies and eat them warm from the oven…even if it’s not until Christmas Eve.

And more importantly, any little things that don’t get done really aren’t that important.

What’s important is right here in front of me. I can’t miss it. I can’t miss them…my children and husband, my family and friends, and the love and laughter they surround me with every day.

Somehow all of this kind of suddenly made sense a few days ago when I saw my Cupcake Wrapper Wreath reposted on The Happiest Home. It’s a project and tutorial I made for them two winters ago, and I started by saying this:

As a stay-at-home mom / work-at-home craft blogger, crafting with my kids is what I do. In fact my job description would probably read something like this: create projects with the help of two assistants (currently ages 3 and 5), photograph said projects (afterwards, crop out smiling assistants from the background), then post project how-to’s and tutorials, while somehow keeping those same two assistants out of trouble.

Oh, and love every minute of itbecause I do.

Two things to note here:

1. I know have THREE assistants, ages 7, 5, and 16 months.

2. I still love it. I just needed to be reminded of that.

I needed to be reminded of how lucky I am that I fill my days at work beside my children.

I’m not sure how much better my job description could get.

And especially right now, when “my assistants” are so filled with the magic of Christmas, their eyes shining with joy, their hearts and minds open to all the excitement that is coming in these next few weeks, I needed a little reminder to slow down and enjoy this.

Somehow everything will get done.

My wish to you this holiday season is this little post serves as a reminder to you, too.

Slow down and enjoy the magic.

Somehow it will all get done.

Enjoy,

Nikki, In Stitches

PS…I hear you. Finding time to squeeze in one more craft project right now seems impossible, but if you find yourself with a few extra minutes of quiet time (or time with your “assistants” for that matter!) take a peek here at the cupcake wrapper wreath tutorial. It’s “assistant friendly”!!

Posted in Blog | Tagged , , , , | 2 Comments

Happy Thanksgiving!

It is (very) early Thanksgiving morning here, a few hours before the craziness of the day will kick in. We have snow on the ground here in the northeast, so aside from dinner prepping and kitchen cleaning, I’ll also be in charge of bundling up the kids for snowball fighting. And while that will add even more excitement to an already event filled afternoon, I wouldn’t have it any other way. My family is on their way here. And together, I plan on enjoying every moment of this very thanksgiving filled day.

And I hope you enjoy your day today just the same way.

Surrounded by family and friends, excitement and anticipation, love and laughs…really the best way to spend any day.

I do have some “housekeeping” things to share with all of you. They are below.

Many of you have asked for some very basic help with your Silhouette cutting systems. I’ve decided to start a free series on my YouTube channel. The first video (4 Tips for Resizing Designs In Your Silhouette Software) is below. (Just a note: I more than likely will not post every one here, so feel free to subscribe to my YouTube channel so you don’t miss any. There is a link below.)

Many of you have also asked about the Silhouette Black Friday sale…that actually starts today. You will also find those sale details below. There is something there for everyone, so whether you’re looking for a machine or supplies, I think you’ll be happy!

Again, enjoy today and this kickoff to the holidays that are ahead.

And speaking of housekeeping…I’ve got work to do around here before everyone wakes up, filled with the excitement that I look forward to every year.

Enjoy,

Nikki, In Stitches

Silhouette Black Friday Sale Details

There are FOUR different bundle options below, so as I said before, there is something for everyone. There is also a discount on supplies, so if you already have a machine, you can stock up for your upcoming craft projects! If anyone has questions about which bundle might fit their crafting needs best, which one makes the most sense for what they’d like to create with it, or what supplies to pick up, please don’t hesitate to send an email my way! [email protected]

(NOTE: Each bundle that includes a CAMEO is a CAMEO 2…the newest model that was just released!)

1. Portrait Bundle

Portrait machine & 1 free year to Club Silhouette for $179.99 (MSRP: $299)

2. CAMEO Bundle #1 (Pssst! This is a good one for those of you just getting a machine!)

CAMEO machine, Designer Edition software upgrade, Dust Cover, 4 Tools and $25 Download card to the Silhouette Design Store for $269.99 (MSRP: $407)

3. CAMEO Bundle #2

CAMEO machine, Design Edition software upgrade and 1 free year to Club Silhouette for $299.99 (MSRP: $470)

4. CAMEO & Portrait Bundle (One for you, one for a friend!)

CAMEO machine, Portrait machine and 2, $25 Download cards to the Silhouette Design Store for $299.99 (MSRP: $530)

Already a Silhouette user?

Use my code STITCHES for 40% off at SilhouetteAmerica.com (*excluding machines, design downloads, download cards, subscriptions and gift cards) PLUS Free Shipping on orders over $25 for the lower 48 states

To get started shopping, click here!

Don’t forget to use my code STITCHES to get all of the discounts listed above.

The sale runs from November 27th through December 8th, but it is while supplies last, so if there’s something you really want, don’t wait too long!

Pssst! 50% off all designs at SilhouetteDesignStore.com, too – no code needed!

Free Beginner Silhouette YouTube Series

I’m so excited about this new YouTube series because I think not only will it be very helpful to beginners, just starting their crafty adventures with their Silhouettes, but it will also be great for those of you that are just getting the confidence to start designing and creating cut files on your own! My first video, 4 Tips For Resizing Designs In Your Silhouette Software, is below, but as I said at the start of this post, I more than likely will not post every one here on the blog. Instead, if you don’t want to miss any, click here and subscribe to my YouTube channel!

(NOTE: If you’re viewing this in your email inbox and can’t see the video below, just click here to watch it right on the Nikki, In Stitches site!)

And one last time, Happy Thanksgiving!

Posted in Blog | Tagged , , , , , | Leave a comment

The Craft Academy Birthday Bash Starts NOW!

Let’s get this party started!

The Craft Academy and “The Crafting With Your Silhouette” Program is turning one and the presents are for YOU!

I just posted FIVE of our favorite lessons that we covered this year in class.

They are FREE for you to enjoy for the next 48 hours!

You will also find THREE clips from our live interactive classes showing you how much fun we have when we craft together!

Click here to head over and get crafting!

If you love what you find at the birthday party as much as I think you will, I’d love for you to join us inside The Crafting With Your Silhouette program!

Please use the promo code BIRTHDAYBASH and get your first three months 50% off!

But wait! There’s more!

When you enroll, you also get:

  • All THIRTY-SEVEN (and counting!) lessons we’ve covered so far!
  • Replays of all of our live classes!
  • Instant access to our community forum!
  • EVERY free design we’ve used throughout the year, including the THIRTEEN freebies just released to current students as part of the birthday bash!

Want even more details on The Crafting With Your Silhouette program? Click here!

And enjoy your free lessons!

Happy Birthday!

Nikki, In Stitches

(Not a Silhouette owner? There are new classes coming to The Craft Academy SOON! If you have a crafty medium you’d like to learn more about, let me know! I can add it to the curriculum! Send me an email at [email protected]!)

PS…Want a peek at the five free lessons waiting for you?

Scroll down!

PPS…Can’t wait to get the party started?

Click here and get started crafting your five free lessons NOW!


Posted in Blog, What's New | Tagged , , , , | Leave a comment

How To Paint And Age A Picture Frame (Using Chalk Based Paints and Dry Brushing!)

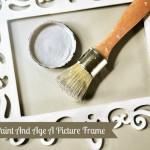
I’m so excited to be sharing one of my favorite painting techniques with all of you today. We’ll be painting and aging a picture frame with chalk-based paints and chalky finish paints. I use this same “dry brush” method to paint almost everything. From picture frames to furniture, it couldn’t be more versatile. It also is so simple that it makes for a great beginner technique, but looks so great even painting pros will love using it.

Dry brushing can be done with really any paint, but I find it easiest to work with chalk-based paints or chalky finish paints. These paints have become so popular that they are now very easy to find and come in a variety of colors. If you can’t find the exact shade you’re looking for, with a quick search online, you can even find recipes for making your own.

Along with the complete step by step directions, I’m also sharing five tips for painting with chalk-based paints and chalky finish paints; this way you’ll quickly move from small scale picture frames to large scale pieces of furniture!

Materials:

-Picture frame (I found mine in the unfinished wood section of my local craft store for under $4)

-Paint (I am not partial to any brand of chalk-based paint or chalky finish paint. This technique works with all of them!)

-Paintbrush (You can find them in stores like Michaels)

-Sand paper (Same store options)

-Wax (You can usually find this right with the chalky finish paints!)

-Paper towels

-White cloth

Directions:

One of the nicest perks of using chalk-based paints and chalky finish paints is that *most of the time* there is no prep work needed. You can get right to the fun of painting! I’m using an unfinished frame in today’s tutorial, so I’m ready to paint! If your piece is already painted or chipping, you should hit it with some sand paper to smooth the surface out some.

Tip #1: Speaking of Sanding…There’s Never A Bad Time To Sand

When painting with a technique like this, where you layer colors of paint on top of each other, there really is no bad time to sand. A quick round of sanding can smooth away any brush strokes you may have. It can also give your piece a soft, smooth feeling, which I personally prefer! So throughout this tutorial, I mention times when you may want to sand your piece, but there really is no bad time to do it. Just be sure that after you sand, you wipe away any dust with a damp cloth. You don’t want that dust clumping as you layer on your next paint color!

As soon as your piece is ready to go, get started painting! Your first coat should be your base color. In this case, I chose a white to start with. Whenever possible, go with the grain of your wood. If you can’t see the grain, don’t worry! You can’t mess this part up! Run your finger along the wood both ways, the softer (less grainy) feeling is the direction you should paint towards. If you think your piece needs another layer of paint because the color or texture underneath is showing through too much for you, go right ahead and paint it again. Just be sure that the first layer dries completely first. And when you’re finished with this base coat completely, you may want to sand it. This is a good time to get rid of any brush strokes that may be visible. Again, just remember that you’ll want to wipe away the dust from the sanding process afterwards!

Tip #2: Buy A Better Brush

As I said at the start, chalk-based paints and chalky finish paints have become very easy to find and you don’t have to spend very much money on them. I always suggest taking that money you saved and buying yourself a really good paintbrush. You will find that your paint goes on so much smoother. You’ll use less paint. And a better brush will last you much longer…as long as you take care of it! Clean it as soon as you’re finished using it and let it hang to dry!

Tip #3: Paint From A Cup

Do not paint from the can! Pour a little bit of paint into a paper cup or onto a paper plate, and paint from there. Your paint can will stay much neater. Your paint inside will stay in much better condition. And most importantly, you will use much less paint! If there is an entire open can of paint in front of you, you just will naturally dip into it more often. If you have a limited amount of paint in front of you to use, you’ll find yourself making that paint last a lot longer!

Now we’re going to add some color. People sometimes get nervous here, but please don’t. Again, you can’t mess this up!

This is where the dry brushing comes in. In this tutorial, we’re only going to add on one accent color with this dry brushing technique. As you get better and more comfortable with painting, you can start to layer multiple colors together!

Tip #4: I Mean A Really Dry Brush

I can’t stress this enough. When I say a “dry brush” I mean a really dry brush! Remember, you can always add more paint on. It’s not so easy to take it off! Dip your brush into your paint, and then work almost all of that paint off onto a paper towel. You want very, very little paint on your brush! Then very lightly sweep your brush over your piece, again going with the grain whenever possible. Repeat this process until you have layered on enough paint to achieve your desired look. I, personally, like a lot of my base color to show through, but you may want a more concentrated look, and that is totally fine! Just remember, really work most of the paint off of your brush onto a paper towel. Then layer the color onto your piece slowly!

If by chance you put too much paint on your piece, walk away! Let it completely dry, and then sand some of the paint off. Be sure you wipe away any leftover dust, and then start fresh.

When you have achieved your desired look, let your piece completely dry. This shouldn’t take that long because the dry brushing doesn’t put very much paint on your work surface. This would be another good time to hit your piece with sandpaper. If you have a finer grit this would be the time to use it. (NOTE: The lower the number on your sandpaper, the rougher it is on your work surface! Use those really low numbers to sand away chipped paint and brush strokes. Use the high numbers to really smooth and/or polish your almost finished piece!) You’ll get a very soft smooth feel to the surface of your work!

Tip #5: Don’t Skip The Wax

At this point, you’ll be so excited to have successfully painted your piece, that you’ve probably already picked out a spot for it in your house. But please take the time to put on a quick coat of wax. It’s simple to put on. Just grab a white cloth and rub it on your piece. Again, just as with your paint, remember a little goes a long way! Don’t use too much or your piece will feel “sticky.” You’ll immediately see why this is so important. Yes, it will protect the surface of your piece from scratches or stains. But it also instantly brings out the grain of your wood, and the colors of your paint will “pop” off of each other. It is absolutely worth the extra step before you put your finished piece out for everyone to admire!

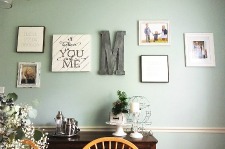
And that’s really how simple painting and aging frames and furniture with chalky finish paints and chalk-based paints can be! I encourage you to experiment with different colors, mixing them together and layering them on your piece. The possibilities are endless! Make sure to add in the perfect picture afterwards. If you don’t already have one handy, you can order various prints with photo sites like Shutterfly.

Enjoy,

Nikki, In Stitches

Posted in Blog, Latest How-To's | Tagged , , | 1 Comment

The Nikki, In Stitches Craft Academy Is Turning One!

The Craft Academy is turning one!

I can’t believe I just typed that!

To say this has been the most exciting year of my career would be a complete understatement.

But what makes The Craft Academy so special is all of you.

I started The Craft Academy as a place to teach specific craft techniques. A place that would allow more detailed instruction that what can happen here on this blog.

And not only have I been able to teach hundreds of crafters there, and inspire them to branch out, try new mediums, and experiments with different techniques…

But it has also grown into a community that continually warms my heart.

We craft live together once a month, but we are constantly in contact with each other through the class forums.

We share projects. We motivate each other. We inspire each other.

Throughout this year, all of you have inspired me to reach outside my comfort zone, as well, and for that I am so very grateful.

And what better way to say thank you than a party, right?

All of the details can be found on The Craft Academy site here.

There will be:

  • Free glimpses into our favorite lessons from our first year!
  • Clips of our live interactive classes where you see our lessons put together into projects!
  • Free designs for current students!
  • ONE YEAR scholarships to give away!

And because I am THE WORST at keeping secrets, here’s a peek at some of the lessons we’ll be sharing!


I’d love to see you there for the party! Remember, all of the details can be found here.

And thank you so much for such a fabulous year!

Nikki, In Stitches

Posted in Blog, Hot Topics | Tagged , , , | Leave a comment