• Skip to primary navigation
  • Skip to main content
  • Skip to primary sidebar

Nikki, In Stitches

Wife, Mom, Maker

  • Blog
  • About
    • Meet Nikki
    • Privacy Policy
    • Disclosure
  • Make It Together
  • Contact
  • Show Search
Hide Search

Create Your Own Story Wall

Nikki · August 16, 2016 · 2 Comments

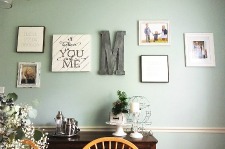
Every little thing on this wall means so much to me.

Special days, lyrics, favorite pictures…

It’s our story…literally from the day we met, to our most recent family photo.

It’s all there, with plenty of room to grow.

Plenty of room to fill it with even more of our story.

Ready to tell your own story?

Here are a few quick tips to get you started.

Enjoy,

Nikki, In Stitches

The “M” in the center is just a pre-made brown paper mache letter from the craft store. Give it a coat of black craft paint, let it dry, and then put on a layer of Martha Stewart’s Sterling Metallic craft paint…it will look exactly like punched metal.

You guessed it…the wood is all stained with my favorite tea, vinegar, and steel wool technique!


Those square frames…they aren’t really frames. Use your imagination when roaming the aisles of your craft store. Unfinished blanks from the craft store, with a piece of canvas textured poster board inserted in the center…instant (and simple!) frame.

The dates in the frames are metallic silver vinyl. I know what you’re thinking…but vinyl doesn’t stick to canvas! Nope. It doesn’t! But give the canvas a quick coat of paint, and it will stick on there forever! I use Martha Stewart’s Wedding Cake White…it’s a perfect match for the color of the blank canvas!

Because I know you’re going to ask…the dates in one “frame” are the day we met, the day we were engaged, and the day we married. The other set are our children’s birthdays. (And I Believe by The Four Tops was our wedding song!)


Filed Under: Blog, Featured Posts, Home Decor, Latest How-To's, Silihouette Projects Tagged With: Crafts, DIY, Finishing Touches, Home Decor, Make in Under 30 Minutes!, Nikki, Picture wall, Silhouette CAMEO

Reader Interactions

Comments

  1. Charles says

    August 30, 2016 at 3:22 am

    Hi, absolutely loved all the pictures, I will definitely give it a try

    Reply
    • Nikki says

      September 15, 2016 at 4:37 pm

      Thanks so much, Charles! So happy I could inspire you!

      Reply

Leave a Reply Cancel reply

Your email address will not be published. Required fields are marked *

This site uses Akismet to reduce spam. Learn how your comment data is processed.

Primary Sidebar

Wife. Mom. Maker.
A little bit of all of that goes here.
Read more.

Search DIY Tutorials

  • facebook
  • instagram
  • mail
  • pinterest
  • youtube

Categories

On My Work Table Today

I’ve completely lost myself in my current design. I don’t mean like lost my sense of style, or lost my motivation, or even lost track of what direction I wanted to take this piece. I mean like I literally lost myself. I’ve been in my studio for hours on end, draping, drafting, and editing on repeat. I am a complete mess, in every sense of the word. My studio is covered in discarded … [Read More...] about Lost In Design…And Loving It

My Favorite Projects

Curtain Rod Connectors Part 2 – Create Your Own Custom Corner Curtain Rod

December 14, 2021 By Nikki Leave a Comment

Curtain Rod Connectors Part 1 - Give The Appearance Of One Continuous Rod

Curtain Rod Connectors Part 1 – Give The Appearance Of One Continuous Rod

October 27, 2021 By Nikki 1 Comment

Tips For Installing Your Own Picture Frame Molding

Tips for Installing Your Own Picture Frame Molding

October 6, 2021 By Nikki Leave a Comment

My Recommendations

Silhouette Cutting Systems

DeWALT Tools

Oracle Vinyl

Home Decor Project Ideas

Curtain Rod Connectors Part 1 - Give The Appearance Of One Continuous Rod
Tips For Installing Your Own Picture Frame Molding

Copyright © 2023 · Daily Dish Pro on Genesis Framework · WordPress · Log in · Privacy Policy