How To Mke A GIve Thanks Board (Silhouette CAMEO) Photo 1 I’m Thankful For You! {Silhouette CAMEO® Giveaway!}

I have so very much to be thankful for this year…

…now three beautiful babies (the newest one happens to be a great sleeper to boot!)

…a husband that supports me and my crazy ideas unconditionally

…friends and family that fill my life with so much love my heart sometimes is completely overjoyed

…and all of you.

This little blog has been going now for almost six years, and many of you have been here from the start.

Thank you.

Thank you so much to each and every one of you, those that have been here from day one and those that are just joining us.

This is the most fun I have ever had.

I love every minute of what I do here, and all of you play a huge part in that.

XOXO,

Nikki, In Stitches

PS…Before I get too sappy on all of you, how about a giveaway to kick off this holiday season right???

Who wants a Silhouette CAMEO®? Yup! The big guy is up for grabs!

As always, entry is simple. There is a Rafflecopter box below. If you can’t see it because you are reading this post through your email inbox, click here to be taken right to the Nikki, In Stitches site.

(And before you enter, just a quick FYI! If you are already a Silhouette owner or would like to be one, there is HUGE Black Friday sale starting next week. I’m talking the best sale promotions I’ve ever seen them offer. So if you’re thinking of stocking up on supplies for your holiday projects, hold off a few more days. Stop back here Black Friday for a crazy good discount code! If you’re not sure if a Silhouette is for you, you may want to take a peek at some of my projects and tutorials that I’ve created with mine. Click here to see a full list!)

Good luck!!
a Rafflecopter giveaway

Posted in Blog | Tagged , , , , , , , , , | 269 Comments

Crochet Flower Head Warmer Free Pattern by Nikki In Stitches Crochet Flower and Head Warmer {Free Pattern}

It happens every year….

The weather gets cold, and I get the itch to play with yarn.

Today I have the first of two crochet projects for you, both head warmers. (Head warmer #2 is coming your way next week!)

They are adorable, work up in one night in front of the TV, and make great stocking stuffers, too!

Enjoy,

Nikki, In Stitches

Materials:

  • *100 yards of a “chunky” yarn
  • Size G Crochet Hook
  • Tapestry needle
  • Button

*Any of your favorite yarns can be used for this project. I used Paton’s Classic Wool, but anything that’s a little thick and/or chunky will work up just fine! Just remember, you may need to adjust your hook size accordingly.

Directions:

Head Warmer:

Ch 64. (NOTE: This head warmer will fit an adult. In fact, this is one I made for myself! To adjust it to fit little ones, simply chain fewer stitches!)

Join in round with a sl st, making sure that the chain is not twisted.

Rnd 1: Ch 1. SC in each ch around. Join with a sl st.

Rnd 2: Ch 2. DC in each SC around. Join with a sl st.

Rnds 3 - 6: Repeat Rnd 2 four times.

Rnd 7: Ch 1. SC in each DC around. Join with a sl st.

Fasten off.

Weave in all loose ends.

Flower:

(Don’t let the directions for this flower intimidate you! Once you actually have it in front of you, it’s easier to see exactly where your stitches should be placed. It does get a bit cumbersome to work with by the last round, but trust me…it’s worth it! If, however, you’ve got a favorite flower pattern already, feel free to use that one instead!)

Ch 5. Sl st in 1st ch to make a ring.

Rnd 1: Ch 1. (SC, ch 3) 5 times in ring. Join with a sl st to 1st ch made at the start of this rnd.

Rnd 2: Ch 1, (SC, 5 DC, SC) in each ch-3 sp around. Join with a sl st to the 1st ch made at the start of this rnd.

Rnd 3: Ch 1. Working behind the petals made in Rnd 2, (SC in next ch-3 sp of Rnd 1, ch 5) around. Join with a sl st to the 1st ch made at the start of this rnd.

Rnd 4: Ch 1, (SC, 9 DC, SC) in ch-5 sp around. Join with a sl st to the 1st ch made at the start of this rnd. Join with a sl st to the 1st ch made at the start of this rnd.

Rnd 5: Ch 1. Working behind petals made in Rnd 4, (SC in next ch-3 sp of Rnd 1, ch 7) around. Join with a sl st to the 1st ch made at the start of this rnd.

Rnd 6: Ch 1, (SC, 13 DC, SC) in ch-7 sp around. Join with a sl st to the 1st ch made at the start of this rnd.

Rnd 7: Ch 1. Working behind petals made in Rnd 6, (SC in next ch-3 sp of Rnd 1, ch 9) around. Join with a sl st to the 1st ch made at the start of this rnd.

Rnd 8: Ch1. (SC, 17 DC, SC) in ch-9 sp around. Join with a sl st to the 1st ch made at the start of this rnd.

Fasten off.

Assembly:

Thread loose ends of flower through large eyed needle. Use this yarn to attach flower to head warmer. Attach button in the center of the flower. Weave in any loose ends.

Abbreviations

ch……………chain

sl st…………slip stitch

SC…….……single crochet

DC..………..double crochet

sp…………..space

Rnd……….round

Posted in Easy Projects, Latest How-To's, Yarn | Tagged , , , , , , | 29 Comments

nikki in stitches craft academy logo The Nikki, In Stitches Craft Academy Is Open For Enrollment!

Today’s the big day — The Nikki, In Stitches Craft Academy just officially opened for enrollment!

And before I go into the details of all that the Craft Academy has to offer, I do have a little something special for those of you that have been patiently waiting for this day. From now until midnight tonight, anyone that enrolls can use the promo code CharterCWYS and get the program at over 30% off.

Get the full details, discount and enroll here!

And now for all the fun…

The Craft Academy is special. It has a special place in my heart (many of you know that teaching is one of my passions, and this new site allows me to help so many more of you than I ever could before) and I hope you’ll find that it is a special place for you. A place to learn, share, and make new friends along the way.

4 Reasons You’ll Love The Nikki, In Stitches Craft Academy

1. Crafters Are Fun! The community at the Craft Academy is full of creative, talented, friendly and fun people who enjoy learning new techniques and sharing their experiences. As a bonus to the content provided in the lessons, membership in my first program also comes with access to a members only forum, where you can feel free to post questions, help others work through their crafty mishaps, and get to know your fellow students.

2. I’m here for you, cheering you on! I reply to comments and questions posted in the forums. I personally respond to emails. I am available for live during our monthly online events. I’m here to answer your questions, and get you back to creating as quickly as possible.

3. The community here will inspire you. I am always amazed at how each of you takes one of my ideas and adds your personal touch to it, making it even better. These projects are shared here at The Craft Academy and specifically posted to help motivate you to push your creative boundaries!

4. You’ll find yourself wanting more. The lessons inside The Craft Academy are purposely designed to not just teach a method or technique. They’re specifically written to give you the skills required, but also the push you need to take them one step further. You’ll quickly find yourself thinking of ways to expand on each project taught!

If you’re ready to check out the first program available at The Craft Academy, click here!

What Courses are taught at The Craft Academy?

Courses and programs will be added to the site on a regular basis. Together with guest teachers, I plan to bring you a full curriculum of crafting classes that covers every medium or technique you would like to see. Classes will be taught using a combination of videos, PDF tutorials, and live online seminars.

Today my flagship program opens for enrollment: Crafting With Your Silhouette.

Featured in this program are:

  • Monthly projects built specifically to help you learn every feature in the Silhouette software.
  • Time saving tips and techniques to help you shorten the “learning curve” time often associated with getting familiar with the Silhouette software.
  • Live online events where you can get instant help and feedback on whatever projects you’re working towards completing. (These events will be recorded for playback. You can watch whenever you’d like, as often as you’d like!
  • Community conversations taking place every day, providing the help you need, but also allowing you to build a network of fellow crafters here to encourage you to explore where your Silhouette cutting system can take you.
  • Mini-lessons to increase your confidence and skills, cutting back on wasted time…and supplies.
  • My personal support. I actively respond to comments and questions posted on the site. I also personally respond to emails. I’m here to answer your questions, and get you back to creating with your CAMEO, or Portrait as quickly as possible.

Like I said above, this is special. And if you’re looking for something special, a place to learn and craft online like you’ve never seen before, I’d love for you to join us.

If you’re ready to take a peek at all that “Crafting With Your Silhouette” has to offer, click here!

Hope to see you there!

Nikki, In Stitches

PS..Want a sneak peek at the first month’s lessons?

The theme is “The Background Story.” We’ll be covering everything from making background stencils, background designs for notecards, creating background papers for scrapbooking, and more!

Posted in Blog, Hot Topics, What's New | Tagged , , , , , , , | 3 Comments

how to use silhouette double sided adhesive paper for perfect glitter designs How To Create Perfectly Glittered Designs Every Time! {Plus A Silhouette Portrait™ Giveaway!}

A short and sweet post today featuring lots of goodies (and a giveaway!!), but most importantly, my trick to getting perfectly glittered designs…every time!

1. My secret to perfect glitter is….

Many of you know that glitter is not my friend.

In fact, I am the self-proclaimed “world’s worst glitterer.”

I usually get more glitter in my hair and on my worktable, than I do on my project, and after all the frustration I put myself through, it still doesn’t look that good!

Enter the double sided adhesive from Silhouette, and problem solved.

Below you’ll find a quick clip of me demonstrating exactly how easy it is to use and how perfectly your glittered designs come out…every time. (PS…If the double sided adhesive has sparked your interest, be sure to scroll down to #2 on this list. You’ll find a discount code there waiting for you!)

(If you’re reading this post through your inbox and can’t see the video above, click here to be taken right to the Nikki, In Stitches site!)

Note: The video clip above was taken from my Intro To Your CAMEO Online Class. (That’s why you see me talking to people that are off screen….those were questions posted in the chat by students attending the online class!) We discussed a lot of the basics to getting started with the Silhouette Design Studio software, like drawing basic geometric shapes, replicating and mirroring them, welding letters to make monograms, and tracing images you can find online. If you’d like to see more of class, click here!

2. 30% Off All Specialty Media from Silhouette

Yup! You read that right! All specialty media from Silhouette is 30% off this week. So, if you’re a Silhouette owner, now is a great time to stock up on supplies for all of your holiday projects!

If you’ve been thinking of jumping into the Silhouette fun, now is also a great time for you to dive right in. The bundle packages this month are a steal! Take a look at all the goodies you will get with your machine!

*A Silhouette CAMEO® PLUS all of the specialty media listed below on sale for $269.99 (MSRP: $383.90 = Savings of over $120!)
· 1 cardstock essentials pack (new product)
· 1 pack printable adhesive kraft paper (new product)
· 1 pack printable clear sticker paper
· 1 pack temporary tattoo paper
· 1 pack printable cotton canvas (new product)
· 1 pack chipboard
· 1 pack printable silver foil
· 1 pack printable magnet paper
· 1 pack double-sided adhesive

*A Silhouette Portrait™ PLUS all of the specialty media listed below on sale for $129.99 (MSRP $263.90 = Savings of over $110!)
· 1 cardstock essentials pack (new product)
· 1 pack printable adhesive kraft paper (new product)
· 1 pack printable clear sticker paper
· 1 pack temporary tattoo paper
· 1 pack printable cotton canvas (new product)
· 1 pack chipboard
· 1 pack printable silver foil
· 1 pack printable magnet paper
· 1 pack double-sided adhesive

*And of course 30% off on all specialty media, which includes:
· Cardstock essentials pack (new product)
· Printable adhesive kraft paper (new product)
· Printable clear sticker paper
· Temporary tattoo paper
· Printable cotton canvas (new product)
· Chipboard
· Printable silver foil
· Printable magnet paper
· Double-sided adhesive

See what I mean? LOTS of great deals this month!

Ready to start shopping?

Click here to head on over to the Silhouette site and start adding these goodies to your cart!

And be sure to use promo code STITCHES to get your supplies for a steal!!

Hurry! This sale only lasts from 10/15/13 to 10/24/13!

3. Didn’t someone say giveaway???

Yes, I did!!

As always, all of you get so excited when Silhouette gives me a Portrait to giveaway, and because of your amazing responses each time…they’ve given me another one! Woo Hoo!!

Entry is always easy! Just use the Rafflecopter box below! (If you’re reading this post through your inbox and can’t see the Rafflecopter box below, click here to be taken right to the Nikki, In Stitches site!) Good luck!!!

a Rafflecopter giveaway

Posted in Blog | Tagged , , , , , , , | 93 Comments

A Halloween Display Filled With Simple Craft Projects You Can Make Yourself from Nikki In Stitches Halloween Craft Tutorial Round Up

I’m not sure what it is about Halloween that I love, but it ranks pretty high on my list.

It could be the excitement that I see on my kiddos’ faces, as they change their minds over and over again while trying to decide on a costume, or the way their eyes twinkle, thinking about how much candy they hope to gather while trick-or-treating.

It could be the ever changing home decor that comes with all the fall/winter holidays. Somehow my house feels even more like a home when it’s dressed in its holiday best.

Or it could be simply that I know November is around the corner.

Any way you look at it, I love Halloween.

Take a peek below at some of my favorite spooktacular projects and hopefully you’ll fall for all things haunted as well!

Enjoy,

Nikki, In Stitches

1. Simple Halloween Wreath {Just Add Glue!}

Not only is this the easiest wreath you’ll ever make, the post will give you quite a chuckle. (Admit it. When craft supplies are on sale, you just can’t say no!) Click here to get your giggles.

2. 5 Simple Projects Needed To Create Your Halloween Display {And 3 Tips For Making It Last Throughout The Holiday Season}

Ah, yes. You’re the person that would like to decorate, but you’re also the person that realizes in December, when it’s time to put up the Christmas decor, that “Whoops!” the pumpkins, witches, and ghosts aren’t going to put themselves away! My post from last year gives you some great tips for extending the life of your fall decor, plus a video guide for simply “Boo!”tiful decorations!

3. Halloween “Pins” and Needles

And here is where I stash all of the ideas I haven’t gotten to and dream of creating for next year! (Hmmm….I hear my craft store’s clearance rack calling my name!)

*BONUS! There are even more Halloween DIY’s here on the blog! Click here for a full list! Happy Crafting!

Posted in Blog | Tagged , , , | Leave a comment

Boo! Haunted Halloween Picture Frames - Decoupage by Nikki In Stitches Haunted Halloween Decoupage Picture Frames

How many of you have a “go-to” technique or project?

You know…the one that you fall back on time and time again.

The one you recreate for different holidays.

Or the one you’ve turned into gifts for countless family members and friends.

Decoupage frames are my “go-to” craft.

So when I was in need of a quick Halloween project (preferably kid friendly!) and spotted three unfinished little frames linked together, I instantly knew what I would do with them!

The how-to for this spooky Halloween home decor is below. If you’d like to see how I’ve used this same technique on other frames, take a peek here!

Enjoy,

Nikki, In Stitches

A quick note before you get started: MOST of this project is kid friendly. And, depending on what techniques you use, ALL of it certainly could be! My little ones love to help paint the unfinished frames and decoupage the papers to them. And, as long as you’re there to smooth out any “globs” they leave behind, it’s really a “can’t mess it up” perfect project for them! I chose to use glass etching cream (and a stencil I cut with my Silhouette CAMEO) to create the “BOO,” and so for me, that’s where the “kid friendly” project stopped, but you could certainly find stickers that would work, or even just print out the letters on cardstock, cut the paper down to size, and let them insert the pieces into the frames themselves.

Materials:

  • Unfinished Frames
  • Paint and paint brush
  • Decoupage medium and paint brush
  • Scrapbook or decoupage papers (NOTE: You could even use a left over Halloween themed napkin from last year!)
  • Sandpaper and chalk pastels (or alcohol inks work well, too!)
  • Glass etching cream and stencils (REMEMBER: Stickers or even letters printed on card stock can be substituted here!)
  • Basic crafting supplies, such as scissors, pencil, ruler, etc.

PS…If you have a Silhouette cutting system and can act fast, their Glass Etching Starter Kit is on sale right now, but only for a few more hours! You can click here (scroll to the bottom of the page to select the glass etching starter kit!) and use promo code STITCHES to grab it for a steal! Happy Crafting!!

Posted in Blog, Easy Projects, Latest How-To's | Tagged , , , , , , , , , , | Leave a comment

glass etching starter kit sale and silhouette portrait giveaway from nikki in stitches Glass Etching Starter Kit Sale {And A Silhouette Portrait™ Giveaway!!}

I *think* I’m back to a regular blogging schedule.

I *think* so.

At any point, my five week old could completely change the nice routine I have our little family following, but for now…I *think* you’ll be hearing from me again once a week, and I’ll be sending lots of fun DIY’s and tutorials your way.

So, to get the ball rolling again, let’s have a giveaway!

Who wants a Silhouette Portrait™?

We’ll make entry into the giveaway super easy. Just fill out the rafflecopter form below. (If you are reading this in your email inbox and can’t see the form below, just click here to be taken right to the Nikki, In Stitches site!)

And if you already have a Silhouette Portrait™ be sure to scroll down! Silhouette’s Glass Etching Starter Kit is being featured right now, and I’ve got a discount code for you!

PS…Machines (bundled with the Glass Etching Starter Kit) are also on sale, so if you’re ready to start crafting with a Silhouette cutting system, I’ve got you covered, too!

Enjoy,

Nikki, In Stitches
a Rafflecopter giveaway

Silhouette’s Glass Etching Starter Kit

Now a few details on that Glass Etching Starter Kit and project ideas to get you itching to create!

Here are a few very quick projects I found on the Silhouette blog that are great ways to personalize simple gifts for friends.

PS…There are lots of how-to’s on the Silhouette blog, too, filled with simple techniques for using the glass etching medium!

Simple and sweet, right? The perfect “little something extra” a gift sometimes needs to make the recipient feel even more loved!

And if you have questions about the actual technique, here’s a video tutorial for using the etching cream, right from Silhouette!

Glass Etching Starter Kit and Cutting System Discounts Details

The glass etching starter kit makes it easy to permanently etch your own designs and text onto glassware and mirrors. The kit includes everything you need to get started creating your own personalized glass etching projects.

Starter kit includes:

  • Etching cream (2 fl oz)
  • Stencil vinyl (9 in x 3 ft)
  • Transfer tape (9 in x 3 ft)
  • Silhouette hook
  • Silhouette scraper
  • 10 exclusive etching designs
  • Instructional DVD
  • Idea/instruction book

MSRP $39.99 Sale Price: $29.99

If you’d like to purchase a Silhouette CAMEO® bundled with the Glass Etching Starter Kit, the discounted price is $269.99. (MSRP $339.98)

And the Silhouette Portrait™ bundled with the Glass Etching Starter Kit is discounted to $129.99. (MSRP $219.98)

Ready to start shopping?

Click here to head over to the Silhouette site and get going!

And be sure to use promo code STITCHES to get your discount!

(This offer is only good from 9/25/13 to 10/4/13!)

Posted in Blog | Tagged , , , , , , , | 66 Comments

Silhouette Stamping Starter Kit - Getting Started Creating Your Own Stamps Silhouette Stamping Starter Kit - A Basic Guide to Getting Started Creating Your Own Stamps

Thank you so very much to all of you that have reached out to me to say congratulations on the birth of Sean, our third baby. You are all so sweet and understanding while I take a few weeks to enjoy as many newborn cuddles as I can.

In fact, I’m still not “back to work” and certainly not getting much craft time these days, but when Silhouette said that this month’s promo was their Stamping Starter Kit, I knew I had to put up at least a quick post, since this seemed to be the new product (it was just released a few weeks ago at CHA) that all of you were most excited about.

So, as I just mentioned, this is going to be a quick post. It’s straight to the point, and hopefully it will answer a few of the questions many of you had about how to use the stamping material.

And YES! The Stamping Starter Kit is on sale this month! If you already have a cutting system, you can buy it on its own, or, if you’re ready to take the leap and purchase a Silhouette cutting system, you can get it bundled with a machine. The details on all your options, as well as all that’s included with each purchase, are at the bottom of this post!

Enjoy,

Nikki, In Stitches

1. How To Use The Silhouette Stamping Materials

Using the Silhouette Stamping Materials really couldn’t be easier. In the picture above you can see a quick set of magnets I made for my kiddos. This is an easy project (perfect for getting familiar with what works and what doesn’t when using this new stamp medium) that uses free designs that come with the Stamping Starter Kit, and is a great way to help showcase my little ones’ artwork that they have already started bringing home from school!

You can see in the screen shot below that creating the stamp in the Silhouette software couldn’t be easier. I have the balloon, which I will cut from the stamping material, and then the outline (a bit larger all around than the actual design) that I will cut from Kraft paper.

NOTE: To make the outline (the background I will cut from Kraft paper), I use the “Offset” feature. Here’s a quick picture tutorial to walk you through it!


And it’s that easy to outline a design! Separate the two pieces and now you have your background shape that you can cut from your Kraft paper, and your actual balloon design that you will cut from your stamp medium!

Note: This same trick works with text, too! You can create a background for a sentiment, or even use this technique to “thicken up” a skinny font!

Using your cutting system, cut the Kraft paper background first. Then the balloon stamp. Place the balloon stamp on an acrylic block. Ink up the stamp. And since the block is clear, it’s easy to line it up on my Kraft background, and simply stamp!

A few of you have already sent questions my way as to how the stamping material works, and I’ve answered three of the most popular requests for help below. If you have other questions, and would like them answered before purchasing, just send them over and I’ll get back to you ASAP! [email protected]

Do you have to use a special cutting mat?

YES! The Stamping Starter Kit comes with a special cutting mat, and you must use it to create the stamps. It is perforated with little holes, which help keep your stamp from distorting during the cutting / transferring to the acrylic block process.

Do all designs in the Silhouette Online Store work as stamps?

I can’t answer that just yet since I myself am just getting started, but I can say that with a bit of playing, you can make most of your favorites work. Keep in mind, you don’t use a transfer paper to move your stamp from your cutting mat to your acrylic block, so if there are lots of tiny pieces in your design, getting them all in the right spots could be tricky. Personally, I am starting with simple shapes and slowly starting to play with more complicated ones!

Do you have to mirror your text when making a stamp?

No. The stamping material will adhere to the block from either side, so there really isn’t a need to flip your text…just flip your stamp before sticking it to your acrylic block!

2. Silhouette Stamping Starter Kit Sale Details

As I said before, the Stamping Starter Kit is on sale this month, 20% off.

The kit includes:
• 3 sheets of stamp material (6 in x 7.5 in) • cutting mat
• 3 in x 4 in acrylic block
• 2 in x 3 in acrylic block
• 2 in x 6 in acrylic block
• black ink pad
• 10 exclusive stamp designs
• instructional DVD
• idea/instruction book

MSRP: $29.99
Sale price: $23.99

You can also purchase the kit bundled with with either a Silhouette CAMEO or Portrait.

The CAMEO bundle includes:
•Silhouette CAMEOSilhouette®
•CAMEO® electronic cutting tool Power cable/AC adapter
•USB cable
•Silhouette Studio® software
•$10 download card
•12 in x 12 in cutting mat
•Silhouette blade
•Basic Instruction Guide
•CAMEO instructional DVD
•Stamping Starter Kit

MSRP: $329.98
Sale Price: $269.99

The Portrait bundle includes:
•Silhouette Portrait™ electronic cutting tool
•Power cable/AC adapter
•USB cable
•Silhouette Studio® software
•$10 download card
•8 in x 12 in cutting mat
•Silhouette blade
•Basic Instruction Guide
•Portrait instructional DVD
•Stamping Starter Kit

MSRP: $209.98
Sale Price: $129.99

Ready to start shopping?

Click here to head over to the Silhouette site and get going!

And be sure to use promo code STITCHES to get your discount!

(This offer is only good from 9/4/13 to 9/13/13!)

Posted in Blog | Tagged , , , , , , , , | 2 Comments

Party Of Five - Welcome new baby to Nikki, In Stitches Party Of Five

Well, a “Party Of Five” plus one very bad yellow lab, that at seven years old, still makes Marley look like an angel.

That’s us now…last Monday morning (the 19th) we welcomed Sean Patrick to our little family. He arrived just over two weeks early, and was immediately surrounded by his brother and sister, who honestly can’t get enough of him.

I’m pretty smitten with him, too ♥

(He could be the best cuddler ever.)

So, I’m going to take the next few weeks off. With my oldest starting kindergarten this week, and my middle child starting pre-school shortly after that, my days are pretty full. I’m looking forward to taking this quiet time to just squeeze in as many snuggles with all three of my babies as I can.

But don’t worry.

You know me. I can’t not get crafty for too long!

Be back soon!

Nikki, In Stitches

Posted in Blog | Tagged | 9 Comments

DIY Back to school tumblers from nikki in stitches - vinyl embellished water bottles {DIY} Back To School Tumblers (And A Silhouette CAMEO® Giveaway)

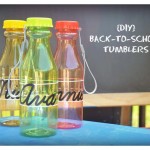
I’ve had these adorable tumblers in my stash of “goodies to embellish” for months, (I grabbed them off of Pick Your Plum at the start of the summer!) and was so excited to dig them out for this week’s project. I’ve got a super simple DIY for adding vinyl to them with a Silhouette cutting system and scrap vinyl…no large pieces required! (You’ll also get a super quick intro to the offset feature in your Silhouette software…a great tool for “fattening up” those thin fonts!)

Note #1: Silhouette’s featured product this month is vinyl, so if you’re interested in picking some up Buy One Get One Free, be sure to scroll down for the link to get started shopping. (CAMEO machines bundled with vinyl are also on sale!)

Note #2: I’m giving Silhouette CAMEO®! I know, you may think be thinking doesn’t Nikki give away a cutting system every month? And honestly, the only reason why I get to give them away so often is because of your great responses to the opportunity! I changed up the entry form a bit this month to make things a little more exciting. You can find it at the very bottom of the post! It’s a fun one! Let’s share some back-to-school stories!

Enjoy,

Nikki, In Stitches

1. DIY Back To School Tumblers

These DIY tumblers couldn’t be easier to make, and the best part is the design is done from scratch. No need to buy anything from the Silhouette online store or another graphics site…you can do this one all by yourself!

First, measure the circumference of your tumbler. For me, it was about 8 1/2″…that’s with a little bit of overlap. We’ll work off of that number for this post, but you can adjust it to fit your tumbler or water bottle accordingly.

Note: The part of my tumblers that I am adhering the vinyl to is straight up and down. This how-to will not work if your cups or tumblers are slanted, i.e. larger at the top than at the bottom. You would need to curve your text, and that’s something we’ll save for another post! However, if you can’t find tumblers like these, don’t stress! This same design would look adorable on a thermos (often straight up and down like these tumblers!) or even a lunch box or plastic pencil case!

In your Silhouette software, click on the “Draw A Line” button and draw three horizontal lines, each your desired length. (Again, for me, it’s 8 1/2″.)

Now click on the “Open The Line Style Window” at the top right of your software.

Be sure your top line is selected. Keep your line solid, but adjust the line thickness to 3.75. You’ll also want to be sure that you’ve selected “Corner” for your “Corner Style” and “Flat” for your “End Cap Style.” Take a look at the screenshot below to see exactly how I have my line adjusted. Make these same adjustments to your bottom line as well!

Now select your center line. You will adjust this line the exact same way, except you’d like this one to be dashed. I used the fourth option down in the “Line Style” options box.

Click the “Open The Cut Style Window” from the top right of your Silhouette software. One at a time, select each of your lines, and then select “Cut Edge” from the “Cut Style” options.

Now we’ve got our lines…let’s add some text!

I used a free font I found called Learning Curve. Using that font, or any other you’d like, type the name you’re going to put on your tumbler.

As you can see, this font is a little on the thin side, which is fine, but just not for cutting vinyl. So I fattened it up a bit using the “Offset” feature of the Silhouette software.

To do so, be sure your name is selected. Then go to the top left of your screen and select the “Object.” Select “Offset” from the drop down menu that appears.

With a little bit of playing around, I found that if I adjust the offset distance to .02 (yes, I know that’s tiny!) it gave me almost an exact replica of the name, just thicker!

Delete out the original text, so you are just left with “thickened” name, and enlarge it to your desired size. For me, I wanted my finished name to be about 1 1/2″ high.

Adjust the distance between your three horizontal lines to fit your text!

From here it’s just a matter of cutting and transferring your vinyl. Cut your lines first from white (or whatever color you’d like) and use transfer paper to adhere them to your tumbler. Then cut your name (again, from whatever color you’d like…in my case, black) and transfer it to your tumbler! Super easy!

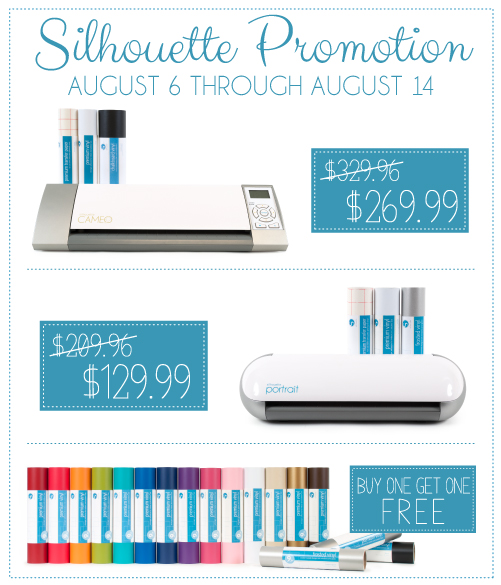
2. Vinyl Buy One Get One Free Sale


As I said above, vinyl itself is on sale, as well as CAMEO machines bundled with it. Here are the details:

  • Silhouette CAMEO®, 2 rolls of vinyl (chalkboard and white) and 1 roll of transfer paper: $269.99 (MSRP: $329.96)
  • Buy one get one free on all Silhouette vinyl! (This is the one I know a lot of your will love!)

Ready to start shopping?

Head over to the Silhouette site and get going!

And be sure to use promo code STITCHES to get your discount!

This offer is only good from 8/6/13 to 8/14/13!

Click here to start shopping!

3. The Silhouette CAMEO® Giveaway!

I’ve decided to spice things up a bit this month, so be sure to take a close look at the entry form below. As always, entering the Silhouette CAMEO® giveaway is easy…I just thought we’d have a bit more fun and share some back-to-school stories! Just use the Rafflecopter app below. This giveaway is open to US residents only! (If you’re viewing this post in your email or through an email reader and can’t see the Rafflecopter box below, click here to be taken directly to the Nikki, In Stitches site.)

a Rafflecopter giveaway

Here is exactly what the winner will receive:

  • Silhouette CAMEO® electronic cutting machine
  • Silhouette Studio® software
  • 51 exclusive cuttable designs
  • Power cable, USB cable
  • 12″ cutting mat
  • Cutting blade
  • $10 gift card to the Silhouette Online Store
  • Basic Instruction Guide

PLUS, I’m adding in my Intro To Your CAMEO class for free!

PLUS, I’m also adding in a free membership in the Nikki, In Stitches Craft Academy‘s first program, “CraftingWith Your Silhouette,” which is now open for enrollment! If you’d like to stop by and take a peek at what’s going on there, click here!

Good luck in the giveaway and Happy Shopping!


Posted in Blog | Tagged , , , , , , , , | 93 Comments